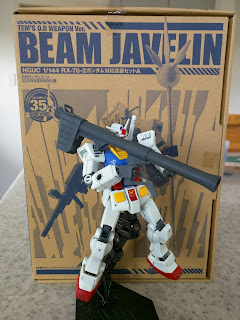
So its been a few weeks since i have put a post up again and I have been quite busy doing a lot of Gunpla. But this was a project that wasn't planned at all but it ended up being a really fun build and I enjoyed it a lot. It started with buying the Gundam Ace magazine mostly because I wanted the weapons. In the end the magazine itself had some really good research materials, i have always found that some Gundam Weapons magazines are really great when it comes to ideas for customs or inspiration.
I put the weapons together and i was happy unfortunately I didn't know what kit to put them on so I ended up looking online at the new Revive Grandpa and it looked pretty good so i bought it. In the meantime I had this idea how about I do a poor man's version of the Full Armour gundam from Gundam Thunderbolt... well maybe not from Thunderbolt but something similar where it has extra weapons and a backpack but its more of a watered down version.
And this is what i came up with:
Now this was just a straight build mostly with the only modifications being some small paint apps on the knee vents, thrusters, eyes, the frame of the elbow knees.
The other modifications were just some small Kotobukiya parts like the missile pod and the backpack arms. The beam cannon on the shoulder which I got from build fighters Kunernai weapon set. The decals were just some stickers that I got free from a hobby shop in Auckland so I thought I might as well use them. there were a few other little modifications that I did but they were abit more than at a basic level but it was nice to experiment on smaller kit with them.
Now to the build itself
This is the box the parts came in I like the simple cardboard box. There were two options for the parts either the beam Javelin or the Gundam hammer. But I read the Gundam hammer's chain was solid plastic so I went for the beam javelin. I also saw the way that GM II handled the beam javelin in the fourth episode of Unicorn OVA and i think my mind was already made up :).
Now this is what the Revive Grandpa's kit looks like. I think this was a real breath of fresh air because it only had two major runners, the other was the multi colour runner, then the beam saber and the poly caps. Its a big change from a master grade box which was good for a change.
It didn't really take me long to put the whole thing together in the end I think I was 80% done in an evening which is very fast for me. And even just as a basic kit it is quite fun to pose.
One other minor modification I did was lightly scraping off the edge of the seem line on each calf. This is something I had been thinking about for a long time. And this kit had only one seem line so I gave it a shot and I can honesty say it was liberating not having to glue and sand for a change i wish i had done it sooner. My only tip would be to give a very thin light panel lining nothing too thick.
Originally it was going to have a over the shoulder bazooka but i decided it was too big for it and just looked over done.
Now the one other thing I tried was creating notches and this does require some skill involving modeling chisels. I wanted it to have the that look of the newer GM kits with notches on the toes. For this I will put a up a tutorial on how to do it at a later date.
And its all finished the action base I borrowed from another kit that is in progress.
Now the beam javelin can have various different combinations with the extra parts that come with it. it even comes with an extra beam saber which would be powering it.
But as you can see you can have a beam trident or even if the beam saber at the end is turned around it can make a long double edged beam javelin. I was really glad I picked this up over the Gundam hammer.
Once it is all completed you can get some pretty nifty poses out of it too. This kits was really fun to build and I had a great time doing it I still look at it and and am quite proud of what I have done. This is proof that you don't have to be an expert to have fun with Gunpla and you can build a kit with some simple and easy techniques to give it a bit of flare.
Just as a reminder, I don't use paints or airbrushes. I only use Gundam markers to get the results I have on my kits even on master grade ones.
I will leave you with a small gallery of the kit itself with all the options that you can do with it.
Happy Gunpla...ing


